Following on from an earlier post we now have 2 new methods for managing SCORM content in Moodle 2.6.
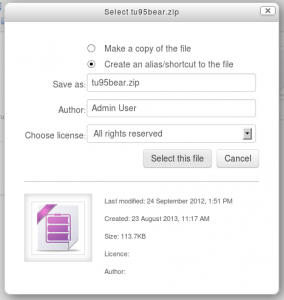
Selecting a Zip package as an alias from a repository.
When adding/updating a SCORM and selecting a Zip package from a repository in Moodle 2.6 you now have the ability to create an alias/shortcut to the file – you can then set an update frequency to set how often Moodle should check to see if there is an updated zip. To set this up follow the steps below:
- Click the ‘Turn editing on’ button at the top right of the course page
- Click the ‘Add an activity or resource’ link in the section you wish to add your SCORM package, then in the activity chooser, select SCORM package then click the Add button (or select ‘SCORM package’ from the ‘Add an activity’ dropdown menu)
- Enter a name and a description.
- click the Add button to open the File picker menu in order to choose a file a repository
- Select the repository that contains your SCORM zip files
- Browse and select the SCORM zip file you wish to add – makes sure you select the option to create an alias/shortcut to the file.

- Set the auto-update setting to “every day” – which will check overnight if a package update is required or “every time it’s used” to check if a new package is available every time a user enters the SCORM.

- Click the button ‘Save and display’ at the bottom of the page and then enter the SCORM package to make sure it has worked!
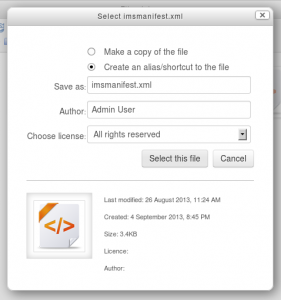
Selecting an imsmanifest.xml from an unzipped SCORM in a file system repository.
This allows you to create a repository that contains all your unzipped SCORM packages – you can also share assets between your SCORM packages – for example if you re-use the same video file across multiple packages you can just link to that single video file from multiple imsmanifest.xml files – you can also update your content and as the content is loaded directly from the repository the user will always see the most up to date file. To set this up follow the steps below(some of this is copied from MoodleDocs)
- First set up a new File system repository (you need direct access to your server to do this)
- Find the moodledata folder on the server
- Inside it, create a folder called “repository” (if it doesn’t exist already)
- Inside that folder, create a new folder for your repository of SCORM packages named appropriately.
- Extract your SCORM packages into appropriate locations within this folder.
- . Enabling the File System repository plugin
- Go to Settings > Site administration > Plugins > Repositories > Manage Repositories;
- Select from the drop down next to File sytem “Enabled and visible”

- Click the Settings link..
- Click Create a repository instance
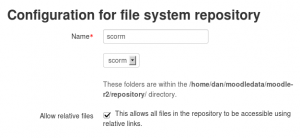
- Give it a name and choose from the dropdown the folder you created with your SCORM packages.
- Click the checkbox “Allow relative files” and Save.
- Adding a SCORM package
- Click the ‘Turn editing on’ button at the top right of the course page
- Click the ‘Add an activity or resource’ link in the section you wish to add your SCORM package, then in the activity chooser, select SCORM package then click the Add button (or select ‘SCORM package’ from the ‘Add an activity’ dropdown menu)
- Enter a name and a description.
- click the Add button to open the File picker menu.
- Select the SCORM file system repository you created in the file picker window.
- Browse and select the imsmanifest.xml file you wish to add – makes sure you select the option to create an alias/shortcut to the file.

- After selecting the imsmanifest.xml file click the button ‘Save and display’ at the bottom of the page and then enter the SCORM package to make sure it has worked!
This method is only currently supported by the file system repository – it’s possible that some of the other repository types could be added in future.

